I will add more information and photographs of the projectors as the work progresses.
Information
If you have any information, story's or pictures of these DP70 please let me know.
If anyone would like to visit that can be arrange just send me an email to steve@spr001.co.uk.
Myself.
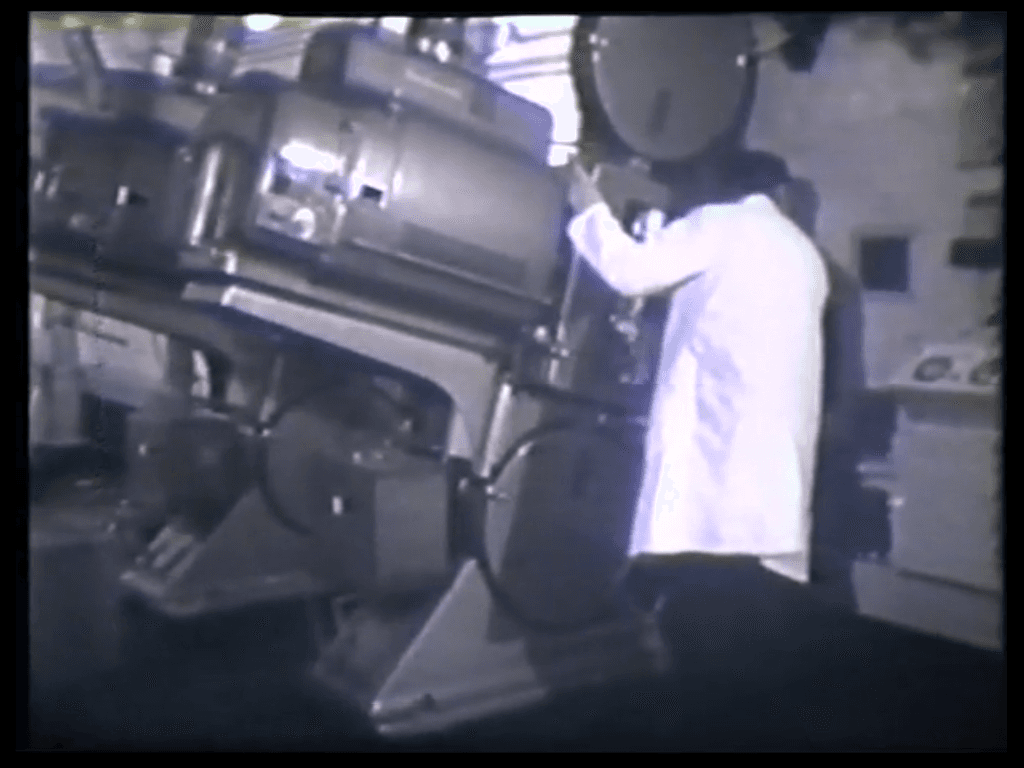
I consider myself to be very lucky as my farther was a BT-H / Westrex engineer and he loved the cinema and the job he did. When he first moved to Altrincham Cheshire he worked as a projectionist at the Odeon Sale Cheshire. Later he applied for 2 jobs, one with British Rail and the other with BT-H. He was offered both job so had to make a choice. BT-H paid less but the job came with a car and a phone so we became the third house in the road to have a phone. We also had a black Morris 1000 with no hand brake.
I went to work with him every chance I got and the Odeon Handley for 4 years was my favourite. In later years I could not pick any one projection box as the majority were spotless and the projectors looked as if the cinema had been built up round them.
My first job was at the Tatton Cinema Gatley. One of only 2 cinemas in the area with down stairs projection rooms. The equipment was Kalee 12's on Western Electric 3A(206) sound heads, Peerless Magnarc's (American) and a Western Electric Mirrophonic amplifier. In all I have worked in 15 cinemas but only twice on DP70's. I have worked on BT-H SUPA Mk1 and Mk2, I have also removed and reinstalled BT-H SUPA Mk1. I have worked on Westar, Westrex 2002, 2003 sound heads, I have owned 3 Westrex 5000 70/35mm projectors also Cinemaccanica Victoria 8 and 10 70/35mm.
For the restoration of the 2 DP70's I needed to get together all the equipment needed to restore projector 's of this size and weight
To move any of the major components requires 2 or more people.
I needed a metal stand on wheels so I could work on all sides of the projector with little effort. This stand I made from the stand of a Westrex 7000 projector to which we added castors.
I purchased a good sized air compressor for sand blasting parts and also paint spraying.
I also needed a multitude of small boxes with lids for the screws and small parts.
I already had a lathe, milling machine, belt sander, grinder, bench top pillar drill and assorted Allen keys and spanners.
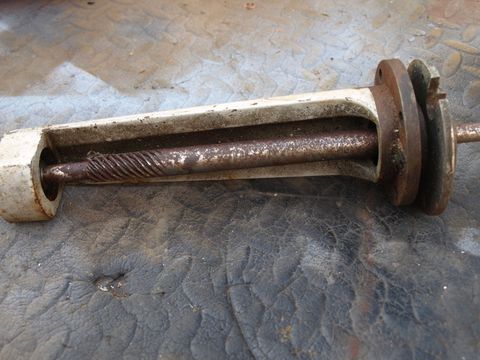
The picture of the shutter shaft drive on the left will give you an idea how bad the whole projector was.
I went to work with him every chance I got and the Odeon Handley for 4 years was my favourite. In later years I could not pick any one projection box as the majority were spotless and the projectors looked as if the cinema had been built up round them.
My first job was at the Tatton Cinema Gatley. One of only 2 cinemas in the area with down stairs projection rooms. The equipment was Kalee 12's on Western Electric 3A(206) sound heads, Peerless Magnarc's (American) and a Western Electric Mirrophonic amplifier. In all I have worked in 15 cinemas but only twice on DP70's. I have worked on BT-H SUPA Mk1 and Mk2, I have also removed and reinstalled BT-H SUPA Mk1. I have worked on Westar, Westrex 2002, 2003 sound heads, I have owned 3 Westrex 5000 70/35mm projectors also Cinemaccanica Victoria 8 and 10 70/35mm.
For the restoration of the 2 DP70's I needed to get together all the equipment needed to restore projector 's of this size and weight
To move any of the major components requires 2 or more people.
I needed a metal stand on wheels so I could work on all sides of the projector with little effort. This stand I made from the stand of a Westrex 7000 projector to which we added castors.
I purchased a good sized air compressor for sand blasting parts and also paint spraying.
I also needed a multitude of small boxes with lids for the screws and small parts.
I already had a lathe, milling machine, belt sander, grinder, bench top pillar drill and assorted Allen keys and spanners.
The picture of the shutter shaft drive on the left will give you an idea how bad the whole projector was.
The Projectors
Because these projector had been taken out in 1980 they had not been cut about for the addition of long runners or none re-wind systems so the spool boxes were intact. The projectors had not had wholes drilled in them for automation systems.
In fact the projectors were almost in the same condition they left the factory in 1958 apart from the rust, dirt, oil, grease, soil and odd paint .
The first thing was to clean a projector and get it running as at that time I had nothing to show films on.
I started by scrubbing to whole projector in paraffin to get all the dirt and oil off, I then set to with the sanders to remove all the rust. At the end of the week I had a projector I could run a reel of films on but it needed painting.
Now I could start on number 692.
I started with the spool boxes, they were so bad I had no choie but to sand them down to the metal in side and out. I removed the hinges and marked them as there was the possibility that each hinge was machined for each spool box.
Next was the upper base with all the wiring, start capacitors, motor contactor, micro switches for the take up and water cooling and the connectors for the projector wiring. I wanted to preserve as much as I could of all this and as it was not going into a commercial situation I did not have to worry about EU regulations.
I removed every thing still wired then set about cleaning it all with a good degreasing agent. After a time the wire and everything came clean and was left to dry.
Next came the projector its self. I had been warned about how tight the screws were in the projector so I bought an impact screwdriver. To reduce the risk of damaging the screw heads I first turned the projector so the back was facing up, I then sprayed the whole thing with WD40 and left it over night.
Next I had a bit that fitted well in the screw slot and started the impact driver slowly all the time pushing hard on to the screw. I managed to get every one out without any damage but they were very tight.